Introduction
Every procurement team knows the pain: a purchase order sits in an approver’s inbox for three days, the supplier chases the buyer, the buyer chases the approver, and by the time the PO is released, the delivery window has shifted. Multiply this by hundreds of POs per month and you have a procurement function that spends more time managing approvals than managing suppliers.
Automated purchase order workflows eliminate this problem at the structural level. The goal is a zero-touch PO approval process—one where the system routes, validates, escalates, and records without requiring manual intervention for routine transactions. This guide shows you exactly how to build one.
What Is a Zero-Touch PO Approval Workflow?
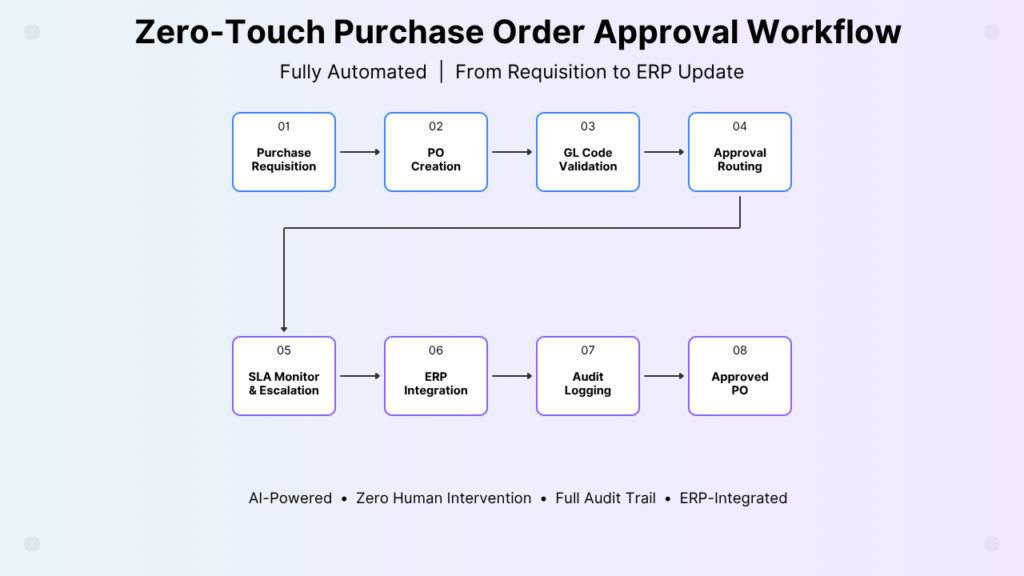
A zero-touch PO approval workflow is an end-to-end automated process that takes a purchase requisition from submission to fully approved PO—and writes the result back to the ERP—without requiring manual steps for standard transactions.
“Zero-touch” does not mean no humans are involved. Approvers still make decisions. What it means is that the system handles everything else: routing the PO to the right approver, enforcing deadlines, triggering escalations, validating GL codes, and updating the ERP record once the approval is complete.
The result is a procurement process where routine POs are processed in hours instead of days, and your operations team focuses on exceptions rather than traffic management.
Prerequisites: What You Need Before You Build
Before configuring your automated purchase order workflow, you need three foundational elements in place:
- A defined approval matrix: Which spend levels route to which approvers? What vendor categories require additional review? Document this before touching any workflow tool.
- GL code taxonomy: Your workflow needs to validate GL codes against the chart of accounts to prevent miscoded POs from passing through approval.
- ERP integration credentials: Whether you’re using SAP, Oracle, or Dynamics, you need bidirectional API access so the workflow can read PO data and write approval results back.
Without these, you’re building a workflow on top of an undefined process—the most common reason automation projects stall after launch.
Step-by-Step: Building Your Zero-Touch PO Approval Workflow
Step 1: Define Your Routing Rules
Your routing logic is the core of the workflow. Map every combination of spend threshold and vendor category to an approval chain:
| Spend Range | Vendor Type | Approval Chain |
| Under $5,000 | Approved vendor | Line manager only |
| $5,000–$25,000 | Approved vendor | Line manager + Finance |
| $25,000–$100,000 | Any vendor | Line manager + Finance + Dept Head |
| Over $100,000 | Any vendor | Full chain + CPO |
| Any amount | New vendor | + Vendor risk review |
Document exceptions explicitly: blanket POs, capex items, regulated categories, and emergency procurement may all require different paths.
Step 2: Configure Conditional Routing in Your Workflow Platform
With your routing rules documented, configure the conditional logic in your automation platform. For each PO trigger:
- Read the spend amount and vendor category from the ERP
- Apply the routing matrix to determine the approval chain
- Assign the PO to the first approver tier automatically
- Set the SLA timer for that tier
Avoid building separate workflows for each spend category. Use a single master workflow with conditional branching—this is far easier to maintain and audit.
Step 3: Add GL Validation
Before the PO reaches any approver, the workflow should validate the GL code:
- Cross-reference the submitted GL code against the active chart of accounts
- Check that the GL code matches the expense category on the PO line
- Flag discrepancies and route to the submitter for correction before approval begins
This prevents miscoded POs from consuming approver time and corrupting your financial reporting. Industry estimates suggest that 8–12% of manual POs contain GL coding errors—automated validation eliminates this category of rework entirely.
Step 4: Set SLA Timers and Escalation Paths
Assign a deadline to every approval tier. When the timer expires:
- Send a reminder notification to the approver
- If no action within [X] hours of the reminder, escalate to the defined fallback approver
- Notify the requester and procurement manager of the escalation
Configure your SLA timers based on the urgency profile of each PO category. Routine operational POs might have a 48-hour L1 timer; time-sensitive capex approvals might need 24 hours.
Platforms like Snoh Flow provide configurable SLA timers at each workflow stage, with auto-escalation paths that activate without requiring manual monitoring. This is where SLA-based workflow escalation transforms from a policy statement into an operational reality.
Step 5: Configure Delegation Rules
Pre-configure delegation for every approver role in the system. When an approver is on leave:
- The workflow automatically routes to their designated delegate
- The delegate receives full context (PO details, requestor, business justification)
- All actions taken by the delegate are attributed correctly in the audit log
Integrate with your HR or calendar system to activate delegation automatically when OOO is set.
Step 6: Connect to Your ERP
Bidirectional ERP integration is what transforms a good approval workflow into a zero-touch procurement process:
- Inbound: ERP sends PO data to the workflow when a requisition is submitted
- Outbound: Workflow writes the approval result (approved/rejected, approver name, timestamp) back to the ERP record
- Status sync: PO status in the ERP updates in real time as the workflow progresses
This eliminates the manual data entry that traditionally follows approval—no one needs to log into the ERP to update a PO status after an email approval.
Step 7: Build Your Audit Log
Every action in the workflow—routing decision, approval, rejection, SLA breach, escalation, delegation—must be logged with full context. Your audit log should capture:
- Actor identity and role
- Action taken and timestamp
- PO details at the time of action
- Any comments or justifications entered
This log is your evidence pack for internal audit, financial review, and compliance reporting. Build it from day one.
Step 8: Test Before Go-Live
Run these scenarios before deploying to production:
- Standard PO below L1 threshold (single approver path)
- PO above L2 threshold (multi-approver chain)
- PO with a GL code error (should route back to submitter)
- New vendor PO (should trigger vendor risk review)
- PO submitted while L1 approver is on leave (should route to delegate)
- PO where L1 approver does not act within SLA (should escalate)
Measuring Success: What Good Looks Like
After deploying your zero-touch PO approval workflow, track these metrics weekly for the first 90 days:
- Average approval cycle time — Benchmark before deployment; target 60–70% reduction for standard POs
- SLA breach rate — Should trend toward zero as escalation paths stabilise
- GL error rate — Should drop significantly post-validation automation
- Manual interventions — Track how often operations staff need to manually move a PO; target is near-zero for standard paths
How Snoh Flow Handles Zero-Touch PO Workflows
Snoh Flow’s PO workflow module includes pre-built templates for procurement approval chains, GL code validation rules, and auto-routing by vendor category or spend threshold. The ERP connector library supports SAP S/4HANA, Oracle Fusion, and Microsoft Dynamics with native bidirectional sync—meaning approval results write back to the ERP without middleware or custom scripting.
For procurement teams managing high-volume PO flows, this combination—conditional routing, SLA enforcement, ERP integration, and immutable audit logging—delivers the zero-touch approval process that operations leaders have historically had to build from scratch.
Conclusion
A zero-touch purchase order approval workflow is not an aspirational state—it’s an achievable operational architecture. The key is building it in the right sequence: define your routing logic first, then configure conditions, add validation, enforce SLAs, connect your ERP, and instrument your audit trail.
Three key takeaways:
- Document your approval matrix and GL taxonomy before touching any workflow tool—automation built on an undefined process will fail
- SLA timers and escalation paths are the mechanism that turns approval routing into a genuinely zero-touch process
- Bidirectional ERP integration is what eliminates the manual data entry that undermines most partial automation efforts
For teams looking to extend this into a full procure-to-pay cycle, the same architectural principles apply—see procurement workflow automation: end-to-end architecture for the complete picture.
FAQ
What is a zero-touch purchase order approval workflow?
A zero-touch PO approval workflow is an automated process that takes a purchase order from submission to approval—and records the result in the ERP—without requiring manual routing, chasing, or data entry for standard transactions. Human approvers still make decisions, but the system handles all the coordination, deadline enforcement, and administrative work surrounding those decisions
How long does it take to build a PO approval workflow?
With a modern no-code workflow platform, a standard PO approval workflow can be configured and tested in two to four weeks. The majority of that time is typically spent documenting the approval matrix and securing ERP integration access—not building the workflow itself. Complex organisations with multiple business units, currencies, or ERP instances should allow six to eight weeks for initial deployment.
What ERP systems work with automated PO approval workflows?
The most common ERP integrations for PO approval automation are SAP S/4HANA, Oracle Fusion, Microsoft Dynamics 365, and NetSuite. Most enterprise workflow platforms support these via native connectors or REST API integration. Bidirectional sync—where the ERP triggers the workflow and receives the approval result back—is the target architecture for zero-touch procurement.
How do you handle exceptions in an automated PO approval workflow?
Exceptions—POs that don’t fit the standard routing rules—should be explicitly designed into the workflow. Define exception categories (emergency procurement, blanket POs, sole-source vendors) and build dedicated routing paths for each. The workflow should never reach a dead end; every exception path should resolve to a defined outcome, even if that outcome is manual escalation to a specific role.
What is GL validation in a PO workflow?
GL (General Ledger) validation is an automated check that verifies the GL codes on a PO against the active chart of accounts before the PO enters the approval queue. It confirms that the account code is active, the expense category matches the PO line items, and the cost centre is correctly allocated. This prevents miscoded POs from contaminating financial reporting and eliminates a category of rework that typically consumes significant finance team capacity.